SketchUp garden layout tutorial for beginners opens up a world of creativity, allowing you to visualize your dream garden with ease and precision. Whether you’re an aspiring landscape designer or just a homeowner looking to spruce up your outdoor space, SketchUp offers tools that can transform your ideas into a stunning reality. This guide will take you through the essential features and tools of SketchUp, helping you set up your project and kick-start your garden design journey.
With its user-friendly interface and powerful capabilities, SketchUp makes it simple for novices to create beautiful garden layouts. You’ll learn how to draw your initial design, organize elements effectively, and incorporate everything from plants to pathways. By the end of this tutorial, you’ll have the confidence and knowledge to bring your garden vision to life.
Introduction to SketchUp for Garden Layout
SketchUp is a powerful and user-friendly 3D modeling software that offers a unique platform for garden design enthusiasts. Its intuitive interface and robust features make it accessible for beginners, allowing them to create stunning garden layouts with ease. Whether you’re a novice gardener or an experienced landscaper, SketchUp provides the tools necessary to visualize your dream garden before planting a single seed.
Using SketchUp for garden design has numerous benefits. It allows for precise measurements and scaling, enabling users to accurately represent their garden spaces. This software facilitates the exploration of various design options, making it easier to experiment with different layouts, plant selections, and hardscaping elements. Moreover, the ability to view designs in 3D offers a realistic perspective, helping users understand how their ideas will translate into the real world. Beginners can also benefit from the vast online community and resources available, ensuring assistance is just a click away.
Basic Tools and Features for Beginners
Before diving into a new project, it’s essential to familiarize yourself with the basic tools and features of SketchUp that are particularly relevant for garden layout design. Understanding these elements will empower you to make the most of the software’s capabilities.
The key tools to focus on include:
- Select Tool: This tool allows you to choose and manipulate objects in your design, making it easy to adjust layouts as needed.
- Line Tool: Use this tool to create straight lines, which are fundamental for outlining beds, paths, and other garden elements.
- Rectangle Tool: Perfect for quickly forming the shape of garden beds or patios, this tool simplifies the layout process.
- Push/Pull Tool: This feature enables you to create three-dimensional shapes by extending 2D surfaces, essential for adding features like raised beds or terracing.
- Paint Bucket Tool: Customize the appearance of your garden by applying textures and colors to different surfaces.
These tools form the backbone of your garden design process, allowing for both creativity and precision.
Setting Up a New Project in SketchUp
Getting started with a new project in SketchUp is straightforward. Follow these simple steps to set up your garden layout effectively.
First, launch SketchUp and select a template that suits your project needs. For garden layouts, the “Architectural” or “Landscape” templates work best due to their measurement units and scaling options. Next, set your measurements by going to the “Model Info” panel, where you can specify the units for your design, whether in feet, inches, or meters.
Once your template and measurements are set, use the “Rectangle Tool” to draw the Artikel of your garden area. It’s important to input accurate dimensions to reflect the actual size of your space. After establishing the boundaries, utilize the “Line Tool” to sketch out pathways, plant beds, and any hardscape features.
Throughout the design process, regularly save your work to avoid losing progress. SketchUp’s autosave feature can be a lifesaver, but it’s always best to save manually as you go. This foundational setup will allow you to start experimenting with your garden layout, ensuring a solid base for your creative process.
Designing Your Garden Layout
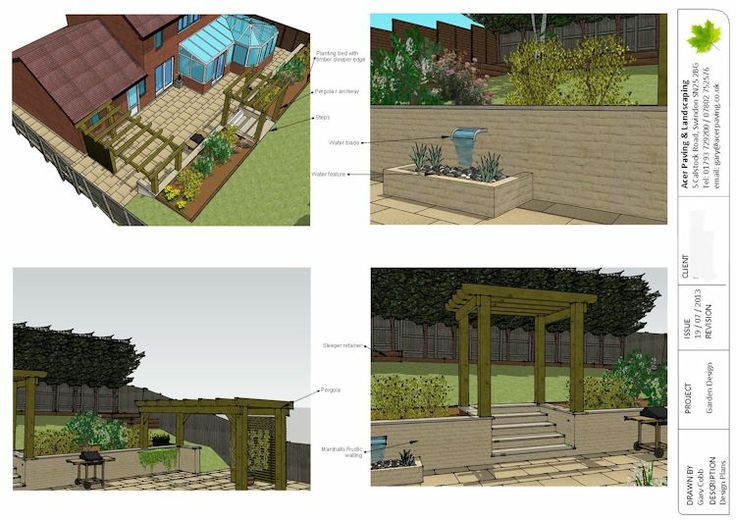
Creating an effective garden layout is essential for both functionality and aesthetic appeal. In this section, we will explore how to utilize SketchUp to visualize and design your garden. By following these steps, you will be able to create an engaging garden layout that reflects your vision and meets your practical needs.
Using SketchUp, the initial steps to creating your garden layout involve setting up your workspace and beginning to shape your design. Start by launching SketchUp and selecting a template that fits your project, like the “Architectural” or “Landscape” templates. Set your scale to ensure measurements are accurate. Begin by sketching the overall shape of your garden, whether it’s rectangular, circular, or more organic. Use the drawing tools to Artikel boundaries, and make sure to consider any existing structures like fences or patios that will influence your design.
Utilizing Layers and Components, SketchUp garden layout tutorial for beginners
Organizing your garden layout in SketchUp becomes significantly easier through the use of layers and components. Layers allow you to separate different elements of your design, making it simpler to edit parts of the layout without affecting others. For example, you can create separate layers for plants, paths, and furniture.
Components take this a step further by allowing you to reuse design elements throughout your layout. When you create a component for a specific plant or garden feature, you can easily replicate it without having to redraw the item, ensuring consistency throughout your design. This not only saves time but also keeps your project organized.
To set up layers in SketchUp, follow these steps:
1. Open the “Layers” panel from the default tray.
2. Create new layers for plants, paths, furniture, and any other relevant elements.
3. Assign elements to their respective layers as you create them.
Common Garden Elements
Incorporating a variety of garden elements into your layout enhances visual appeal and functionality. Below is a list of common elements that can significantly impact your design:
- Plants: Select a mix of flowers, shrubs, trees, and vegetables to create a diverse landscape.
- Paths: Designate pathways to guide visitors through the garden, using materials like gravel, paving stones, or mulch.
- Furniture: Consider including benches, tables, or hammocks for relaxation and enjoyment of the space.
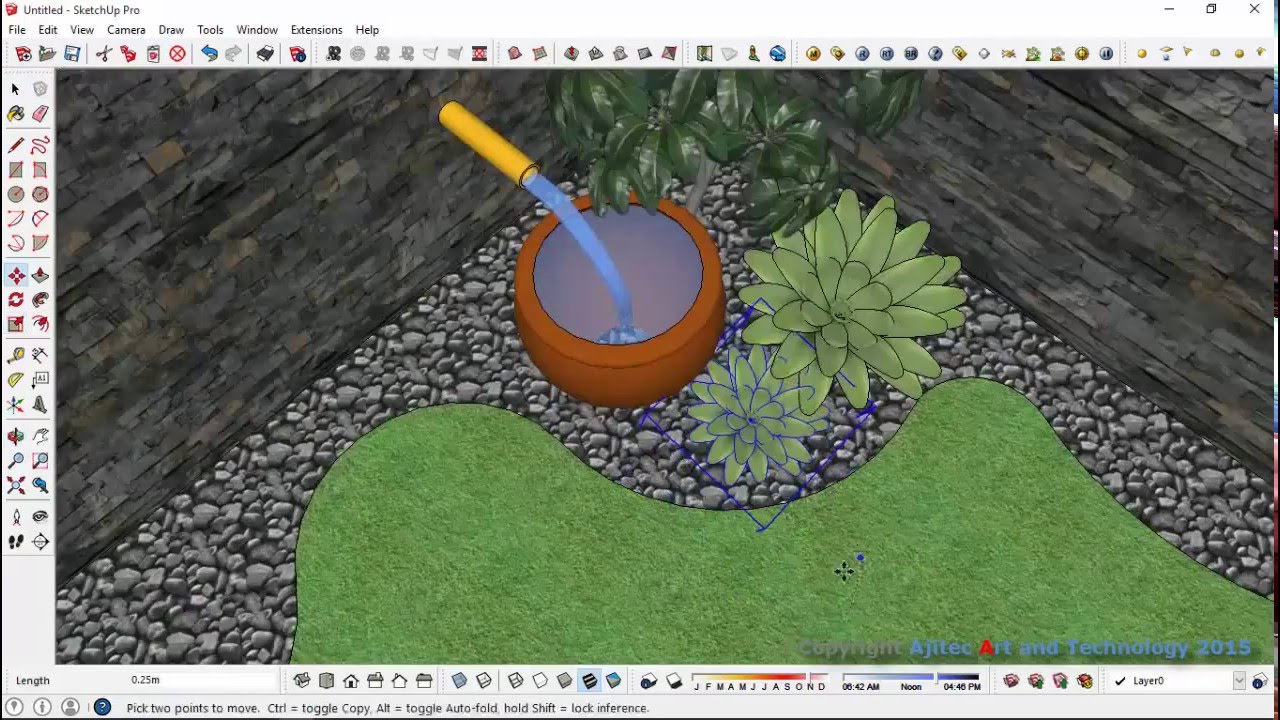
- Water Features: Adding ponds, fountains, or birdbaths can enhance the aesthetic and attract wildlife.
- Lighting: Plan for outdoor lighting to increase usability during the evening and highlight key features.
- Garden Edging: Use materials like bricks, wood, or natural stones to define borders and create visual interest.
When designing your garden layout, think about how these elements interact with one another. For instance, positioning seating areas near flowering plants can create inviting spots for relaxation. Additionally, consider the growth patterns and sunlight needs of your chosen plants to ensure a thriving garden.
“A well-designed garden is a harmonious blend of aesthetics and functionality that enhances both the environment and the experience of its users.”
Advanced Features and Techniques
When diving deeper into garden design with SketchUp, you’ll discover a range of advanced features and techniques that can elevate your projects from basic layouts to stunning visualizations. Mastering these tools not only enhances the aesthetic appeal of your designs but also provides a more accurate representation of the garden environment.
Using Plugins and Extensions
Plugins and extensions significantly expand the capabilities of SketchUp, allowing users to implement specialized tools that streamline the design process. They can help in creating intricate garden features, automating repetitive tasks, and exporting designs in various formats.
Some popular plugins for garden design include:
- SketchUp Garden Planner: Offers pre-made components like trees, plants, and garden furniture that can be easily dragged into your layout.
- Curviloft: Great for creating complex surfaces and organic shapes that mimic natural landscapes.
- Shaderlight: A rendering plugin that allows for realistic lighting and shadow effects, enhancing the 3D visualization of your garden.
Integrating these tools into your workflow can save time and improve the overall quality of your designs.
Applying Textures and Colors
Effective use of textures and colors can bring your garden layout to life, adding depth and realism to your 3D models. Textures help simulate various materials, while colors can set the mood and ambiance of your design.
To apply textures and colors efficiently:
- Choosing Materials: Utilize the Material Browser to select textures that match your desired aesthetic. For example, wood textures for decking or stone textures for pathways.
- Custom Textures: You can import your images to create custom textures. This is particularly useful for representing specific plant species or unique elements in your design.
- Paint Bucket Tool: Use this tool to apply colors and textures to surfaces quickly. Double-clicking on a texture allows you to adjust properties like scale and rotation.
This attention to detail can make a significant difference in the visualization of your garden.
Creating Realistic 3D Models
The goal of any garden layout in SketchUp is to create a model that feels as realistic as possible. There are several techniques you can employ to achieve this level of realism, focusing on scale, detail, and representation of natural elements.
Consider the following techniques:
- Scale and Proportion: Use the tape measure tool to set accurate dimensions and proportions, ensuring all elements look natural within the context of the garden.
- Adding Layers: Layering elements such as plants, paths, and furniture provides depth. Use the “Artikelr” to manage and organize these layers efficiently.
- Lighting Effects: Utilize shadow settings to simulate the movement of the sun throughout the day, enhancing the natural look of your garden layout.
These techniques, along with a well-thought-out plan, can help you create a vibrant and inviting garden space that resonates with viewers.
Practical Tips for Beginners: SketchUp Garden Layout Tutorial For Beginners
Starting your journey in SketchUp for garden design can be both exciting and daunting. As a beginner, navigating the software while crafting your dream garden layout requires some guidance. This section aims to provide you with practical tips, common pitfalls to avoid, and a checklist that will help you finalize and export your designs with ease.
Best Practices for Beginners
To set a strong foundation in using SketchUp for garden layouts, adhere to these best practices. Familiarize yourself with essential tools within SketchUp to enhance your design efficiency. Here are key practices to keep in mind:
- Start with a plan: Draft a simple sketch of your garden layout on paper before translating it into SketchUp. This helps clarify your vision and makes it easier to construct in the software.
- Use layers: Organize your design elements by using layers. This allows you to separate different components of your garden, making it easier to edit and manage.
- Keep proportions in mind: Use the tape measure tool frequently to ensure that the dimensions of your plants, pathways, and structures are accurate relative to one another.
- Utilize components: Instead of creating duplicates of similar objects, use components to save time and ensure consistency across your design.
Common Mistakes to Avoid
When embarking on your garden design project, there are several common mistakes that beginners often make. Recognizing these can save you time and frustration while improving your overall design quality:
- Neglecting sunlight and shade: Failing to consider how sunlight moves across your garden can lead to poor plant placement. Always analyze sun patterns to ensure optimal growth for your plants.
- Overcrowding plants: Beginners may underestimate the space required for plants to thrive. Leave adequate room for growth, as cramped plants can lead to health issues and reduced aesthetics.
- Ignoring drainage: Ensure your design incorporates proper drainage solutions. Poor drainage can cause waterlogging, damaging plant roots and overall garden health.
- Forgetting scale: Visualizing elements at a larger or smaller scale than intended can create imbalance in your design. Make sure to maintain consistent scaling throughout your layout.
Checklist for Finalizing and Exporting Designs
Before exporting your garden design, following a checklist ensures you haven’t overlooked any important details. This will help refine your layout for presentation:
- Review dimensions: Double-check all measurements to ensure accuracy.
- Check plant placements: Verify that plant placements align with your sunlight and spacing considerations.
- Inspect for components: Ensure all components are correctly grouped and without unnecessary duplicates.
- Add annotations: Include notes and labels for different areas of your design to provide context when presenting it to others.
- Export settings: Choose the appropriate file format for your needs, whether it’s a 2D image or a 3D model.
If you’re looking to bring your garden ideas to life, check out this guide on how to create a garden layout in SketchUp made easy. It breaks down the steps you need to follow, making the process super simple even for beginners. Once you’ve got your layout down, consider enhancing your design with tools that streamline your work.
This is where using SketchUp plugins for garden design efficiency comes in handy, allowing you to add features and functionality quickly.
Creating a stunning garden layout can be a breeze with the right tools. If you’re unsure where to start, check out this resource on how to create a garden layout in SketchUp made easy. It offers straightforward tips to help you visualize your space beautifully. Once you’re comfortable, you might want to explore using SketchUp plugins for garden design efficiency , which can elevate your designs and save you time.