Creating a garden design using SketchUp sets the stage for an exciting journey into the world of landscape architecture. This powerful 3D modeling tool brings your garden visions to life, allowing you to visualize every aspect of your design with precision and creativity. With its user-friendly interface and a plethora of features specifically tailored for garden design, SketchUp is ideal for both beginners and seasoned pros looking to elevate their projects.
From crafting intricate pathways and vibrant flower beds to adding tranquil water features, SketchUp empowers you with the freedom to explore and refine your ideas. By utilizing professional-grade tools and plugins, you can turn basic sketches into detailed representations that can be easily adjusted and shared. Whether you’re importing site plans or sourcing inspiration from the 3D Warehouse, the possibilities for your garden design are practically limitless.
Introduction to SketchUp for Garden Design
SketchUp has rapidly become a go-to tool for landscape architects and garden designers due to its user-friendly interface and robust features. With SketchUp, designers can create detailed 3D models of garden layouts, enhancing their ability to visualize and plan outdoor spaces effectively. The software allows users to experiment with different designs and plant arrangements, making it easier to communicate ideas with clients or stakeholders.
One of the standout features of SketchUp is its intuitive modeling capabilities, which enable users to create intricate designs without needing advanced technical skills. The ability to manipulate shapes, add textures, and import models from a vast library makes it particularly advantageous for garden design. Additionally, the software supports 3D visualization, allowing designers to see their creations from various perspectives. This capability is vital in landscape planning as it aids in assessing how elements like plants, hardscapes, and structures interact within the space.
Benefits of 3D Modeling in Landscape Planning
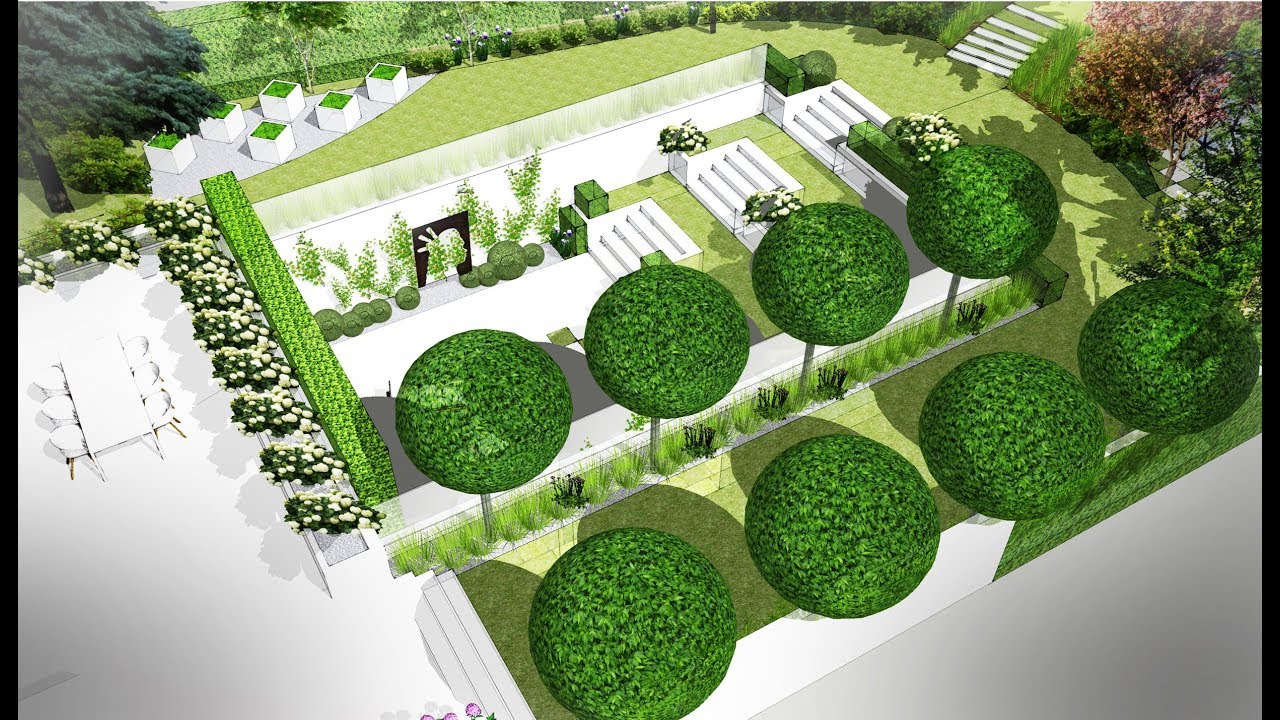
3D modeling offers significant advantages in landscape planning, especially in creating detailed and visually appealing garden designs. The immersive nature of 3D visuals allows for a more accurate representation of how a garden will look in reality. This aspect is essential for making informed decisions about layout and design elements.
The following points highlight the benefits of utilizing 3D modeling in garden design:
- Enhanced Visualization: 3D models provide a realistic view of the garden, helping designers and clients imagine the finished product.
- Design Flexibility: Designers can easily modify elements within the garden plan, experimenting with different layouts and plant combinations without starting from scratch.
- Improved Client Communication: Presenting a 3D model allows for clearer communication with clients, ensuring their preferences are incorporated into the design effectively.
- Site Analysis: 3D modeling helps in analyzing site conditions such as sunlight, drainage, and elevation, enabling more informed design choices.
- Time Efficiency: Rapidly generating 3D visualizations can save time during the design process, allowing for quicker iterations and approvals.
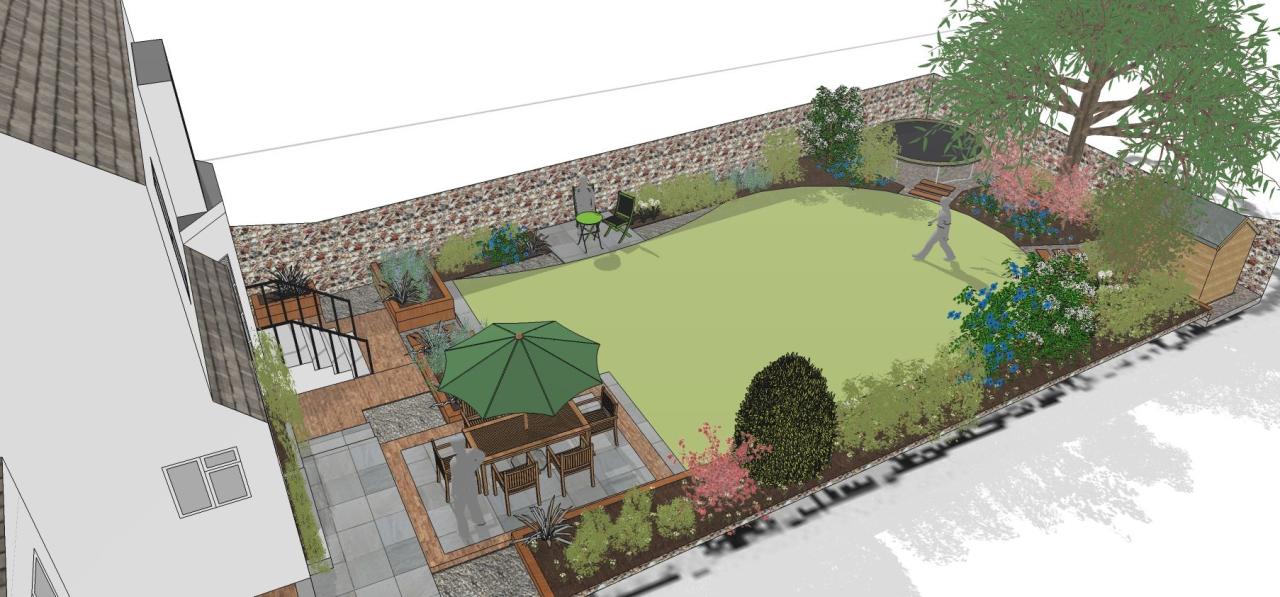
Examples of professional garden designs created using SketchUp showcase its versatility and effectiveness. Many landscape designers have successfully used SketchUp to develop urban parks, residential gardens, and commercial landscapes. For instance, a city park design might include intricate pathways, water features, and native plantings, all accurately represented in 3D. By utilizing SketchUp, designers can ensure that elements such as seating areas, flower beds, and trees are cohesively integrated, resulting in a harmonious and functional outdoor space.
Steps in Creating a Garden Design with SketchUp
Creating a garden design using SketchUp can be an enjoyable and productive process. With the right setup and tools, users can transform their ideas into precise, visually appealing garden layouts. This guide will walk you through the critical steps to effectively create a garden design in SketchUp, ensuring you’re equipped with essential tools and an understanding of how to import necessary resources for a comprehensive design.
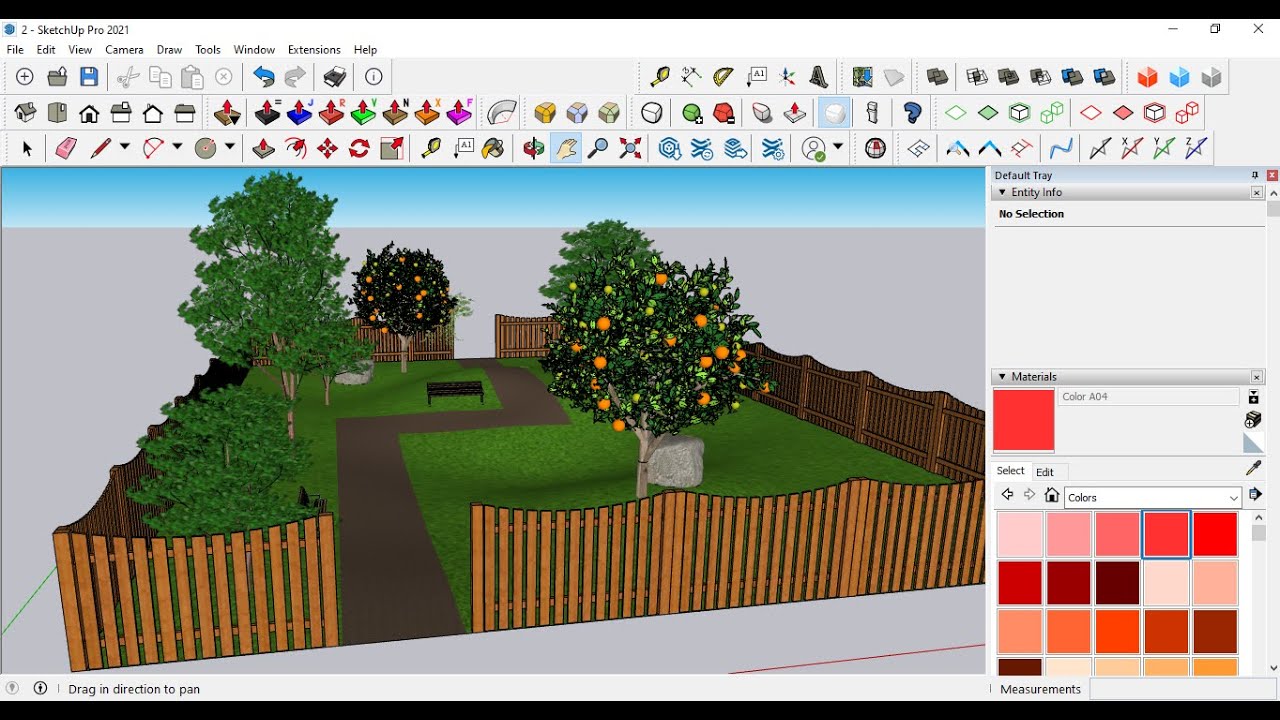
Setting Up a New Project in SketchUp
Starting a new garden design project in SketchUp requires a few straightforward steps. First, open SketchUp and select the template that best fits your project. For garden design, using a template based on architectural scale (like the “Architectural” template) is advisable as it provides an appropriate scale for accurate modeling.
Once the template is loaded, set your project’s units by going to the ‘Window’ menu, selecting ‘Model Info,’ and adjusting the units under ‘Units’ to either imperial or metric based on preference. This ensures that measurements are consistent throughout your design process, which is crucial for accurate planning and implementation.
Essential Tools and Plugins for Garden Modeling
Utilizing the right tools and plugins can dramatically enhance your garden design experience in SketchUp. Below is a list of essential tools and plugins that can streamline your modeling process and provide additional functionality:
- SketchUp’s Push/Pull Tool: This tool allows you to extrude 2D shapes into 3D models, perfect for creating garden beds and paths.
- 3D Warehouse: A vital resource for accessing pre-made models of plants, furniture, and decorations that can be directly imported into your design.
- Instant Fence & Deck: A plugin that helps in designing fences and decks seamlessly within your garden layout.
- Curviloft: This plugin is excellent for creating complex shapes and organic forms, ideal for naturalistic garden designs.
- PlantFactory: A plugin that allows you to generate realistic 3D plant models, enhancing the visual appeal of your garden.
Each of these tools and plugins serves a specific purpose that can help bring your garden design to life, adding depth and realism to your project.
Importing Site Plans and Reference Images
Incorporating site plans and reference images into your SketchUp project is an essential step in ensuring that your design is accurate and reflective of the actual area. To import a site plan, follow these steps:
1. Prepare the Site Plan: Ensure that your site plan is in a compatible format (like JPG or PNG) and scaled correctly.
2. Import the Image: In SketchUp, navigate to the ‘File’ menu and select ‘Import.’ Choose your site plan file from your device. When importing, make sure to check the ‘Use as Image’ option.
3. Position the Image: Once imported, place the image on your workspace. Use the ‘Scale’ tool to adjust the image to match the real-world dimensions, ensuring that it aligns with the garden’s actual size and layout.
For reference images, the process is similar. Use quality images that showcase elements you wish to include in your design. Having these visuals can serve as inspiration and guidance, making your design process smoother and more aligned with your vision.
By effectively setting up your project, utilizing key tools and plugins, and accurately importing essential references, you can create a comprehensive garden design in SketchUp that meets your aesthetic and functional needs.
Designing Specific Garden Elements
Creating a stunning garden involves more than just planting flowers and shrubs; it requires careful planning and design of various elements that come together to enhance the overall aesthetic. This section focuses on specific garden features such as pathways, flower beds, and water features, all of which can be designed using SketchUp. Each element contributes uniquely to the garden’s ambiance and functionality, and utilizing SketchUp can simplify their design and integration.
Pathways
Pathways are essential for guiding visitors through your garden and connecting different areas. In SketchUp, you can design pathways by using the “Line” and “Arc” tools to create smooth, flowing shapes. Consider the materials you want to represent, such as gravel, pavers, or brick, and use the “Paint Bucket” tool to apply textures that mimic these surfaces.
To plan your pathways effectively, keep these points in mind:
- Ensure pathways are wide enough for comfortable walking, typically 3 to 4 feet.
- Use curves to create a more inviting and natural feel, rather than straight lines.
- Incorporate elevation changes and steps if your garden has slopes.
- Consider using lighting along pathways for both safety and ambiance during evening hours.
Flower Beds, Creating a garden design using SketchUp
Flower beds are where you can showcase your planting creativity. In SketchUp, begin by defining the shape and size of your flower beds. Use the “Rectangle” tool for simple designs or the “Freehand” tool for more organic shapes. Once the beds are Artikeld, apply colors and textures to the soil using the “Paint Bucket.”
When designing flower beds, consider the following:
- Plan for seasonal color changes by selecting a variety of plants that bloom at different times.
- Group plants based on height to create a visually appealing layered effect.
- Use the “Group” function in SketchUp to manage each flower bed as a single entity for easier adjustments.
- Incorporate mulch or decorative stones around the plants to enhance the bed’s appearance.
Water Features
Water features like ponds, fountains, or streams can add tranquility and a focal point to your garden design. In SketchUp, start by sketching the layout of your water feature using the “Circle” or “Polygon” tools. Consider the depth and shape of the water body, and use the “Push/Pull” tool to create varying depths.
For effective water feature design, keep these tips in mind:
- Think about the sound of water; fountains can create soothing sounds, while ponds can provide a reflective surface.
- Incorporate plants around the water feature to enhance biodiversity and visual interest.
- Utilize components from SketchUp’s 3D Warehouse to find pre-made water features, helping you visualize your design better.
- Plan the water source and drainage system carefully to avoid water stagnation.
Incorporating Plants and Trees
Incorporating plants and trees into your garden design is a breeze with SketchUp’s 3D Warehouse, which offers a vast library of plant models. To add greenery, first, search for specific plant types that fit your garden’s theme and climate requirements. Download and import these models into your workspace.
Here’s how to effectively incorporate them into your design:
- Use the “Scale” tool to adjust the size of the plants to match real-life proportions.
- Group plants together to maintain organization and make future adjustments easier.
- Consider the growth and spread of each plant over time to ensure they won’t overcrowd each other.
- Experiment with layering, placing taller plants toward the back of beds and shorter ones in front for visual depth.
Finalizing and Presenting the Garden Design: Creating A Garden Design Using SketchUp
Finalizing and presenting your garden design is critical in demonstrating your vision to clients or stakeholders. It’s the stage where your design comes to life through rendering, visualization, and effective communication. Utilizing SketchUp’s features not only helps in refining your project but also assists in delivering a compelling narrative that resonates with your audience.
Rendering your design in SketchUp greatly enhances the visual appeal and understanding of your garden project. By applying realistic materials, textures, and lighting, you can create a lifelike representation. Here are several methods for rendering and visualizing designs in SketchUp:
Rendering and Visualization Methods
Utilizing rendering plugins can significantly boost the quality of your designs. Here is a selection of popular rendering options you can consider:
- V-Ray for SketchUp: This robust rendering engine allows you to produce photorealistic images. It offers advanced lighting, material options, and the ability to manipulate shadows for a more realistic feel.
- Enscape: Ideal for real-time visualizations, Enscape provides instant rendering feedback while you design. It allows you to walk through your gardens virtually, experiencing the space as if you were physically present.
- Twilight Render: A more accessible option, Twilight offers both easy-to-use features and advanced settings for those seeking quality renderings without extensive training.
Creating presentation layouts and exporting images is a key component in how your design is perceived. A well-organized layout can make a significant difference in client understanding and engagement.
Presentation Layouts and Image Exporting
When preparing for a presentation, consider these steps to ensure clarity and professionalism in your layouts:
- Use Scenes: Set up different scenes in SketchUp to showcase various aspects of your garden, such as front views, close-ups of specific elements, and aerial views. This helps guide the viewer through your design logically.
- Create Layouts: SketchUp has a companion tool called LayOut for sketching out professional presentation sheets. You can add dimensions, annotations, and your rendered images to create comprehensive layouts.
- Export Settings: For optimal results, export images in high resolution, preferably PNG or TIFF, for clarity. Adjust the size according to your display needs, keeping in mind the aspect ratio to avoid distortion.
Preparing a walkthrough animation can be an impactful way to present your garden design. It enables clients to visualize the space more dynamically.
Walkthrough Animation Preparation
Creating an engaging walkthrough animation involves several key steps:
- Camera Path: Establish a clear and coherent path for the camera to follow as it moves through the garden. Use the “Add Scene” feature in SketchUp to determine essential points of interest along the way.
- Animation Settings: Adjust the timing and speed of the camera movement to ensure a smooth transition. This may involve fine-tuning the duration each scene is displayed to create a natural flow.
- Rendering the Animation: Utilize rendering plugins such as V-Ray or Enscape that support video outputs, allowing you to export your walkthrough as a video file that can be easily shared or presented.
By following these guidelines for finalizing and presenting your garden design, you can effectively communicate your ideas and ensure that your vision resonates with your clients and stakeholders.
If you’re looking to design your dream garden, you’ll want to check out this guide on how to create a garden layout in SketchUp made easy. It breaks down the process into simple steps, making it super easy to visualize your space. Plus, once you get comfortable with the basics, you can really enhance your design by using SketchUp plugins for garden design efficiency.
This not only saves time but also allows for some pretty cool features that will elevate your project.
After setting up your garden layout, you might want to explore ways to streamline your design process. By checking out using SketchUp plugins for garden design efficiency , you can unlock tools that help you create more intricate designs without the hassle. These plugins can really speed things up, making your experience in SketchUp even smoother, especially when you dive into the details of your layout.