How to create a garden layout in SketchUp is all about bringing your green dreams to life, mate. Whether you’re a novice gardener or a seasoned pro, understanding the principles of garden layout can transform any outdoor space into a lush sanctuary. SketchUp, the clever design tool, offers a digital canvas where you can experiment with plant placements, hardscapes, and all those important little details that make your garden pop. Let’s dive in and see how you can sketch out your perfect green getaway.
We’ll kick off by getting to grips with the basics of garden design, including essential concepts like scale and proportion. Then, we’ll jump into SketchUp, where I’ll guide you through setting up your project, creating a slick 2D layout, and using the software’s nifty tools to visualize your leafy ideas. You’ll learn how to incorporate features like pathways, seating areas, and even water features, ensuring your garden layout isn’t just functional but looks stunning too.
Understanding Garden Layout Principles

Creating a garden isn’t just about planting flowers and vegetables; it’s about crafting a harmonious space that reflects your style while accommodating the natural environment. Understanding the principles of garden design and layout is crucial for anyone looking to cultivate a garden that’s both functional and aesthetically pleasing. This section will explore the foundational concepts that underpin effective garden layouts, highlighting the significance of scale and proportion, as well as discussing various design styles that can influence your choices.
Basic Principles of Garden Design
Garden design hinges on a few basic principles that guide the layout and overall aesthetics. The primary principles include balance, unity, focal points, and rhythm. Balance involves distributing elements evenly across the garden, creating harmony whether through symmetry or asymmetry. Unity ensures that the garden feels cohesive, where plants, structures, and pathways complement each other. Establishing focal points, like a striking sculpture or a vibrant flower bed, draws the eye and adds interest. Rhythm is created by repeating elements or patterns, guiding movement throughout the space.
Importance of Scale and Proportion
Scale and proportion are essential in garden design, affecting how spaces are perceived and experienced. Scale refers to the size of elements in relation to one another and to the overall garden area. For example, a towering tree may feel overwhelming in a small garden, while delicate flowers might be lost in a vast expanse. Proportion focuses on the relationship between different components, ensuring that each element feels appropriately sized and positioned. A well-proportioned garden creates visual harmony, where plants, paths, and features work together seamlessly.
“Scale and proportion can make or break the visual appeal of your garden—get them right for a balanced aesthetic.”
Common Design Styles and Layout Choices, How to create a garden layout in SketchUp
Different garden design styles greatly influence layout choices, offering various ways to express personal taste and adapt to environmental conditions. Here are some prevalent styles and their impact on layout:
- Formal Gardens: Characterised by geometric shapes and symmetrical layouts, formal gardens often include neatly clipped hedges and central pathways, creating structured and disciplined spaces.
- Cottage Gardens: These gardens embrace a more relaxed, informal aesthetic featuring a mix of flowers and plants, often leading to a vibrant, densely planted layout that feels lush and inviting.
- Zen Gardens: Inspired by Japanese aesthetics, Zen gardens focus on minimalism and natural elements, using rocks, gravel, and sparse plantings to create a tranquil, meditative space.
- Modern Gardens: With an emphasis on clean lines and a limited plant palette, modern gardens often feature open spaces and use hardscaping to create a sleek and sophisticated look.
Understanding these design styles allows you to make informed decisions about your garden layout, ensuring that it aligns with your vision and the specific characteristics of your outdoor space. Each style provides a different approach to arranging plants and structures, impacting how you interact with and enjoy your garden.
Using SketchUp for Garden Design

SketchUp is a powerful tool for creating stunning garden designs that not only look great on paper but also translate seamlessly into the real world. The ability to visualize your garden layout in 3D allows for a more intuitive planning process, helping you to identify the best plant placements and features for your outdoor space. This guide provides a straightforward approach to setting up SketchUp specifically for garden design, along with practical steps to create a detailed 2D layout and effectively use various tools for visualisation.
Setting Up SketchUp for Garden Design
Before diving into garden design, proper setup in SketchUp is essential. Start by ensuring that you have the latest version of SketchUp installed. Upon launching the software, follow these steps to get your workspace ready:
1. Create a New Project: Choose the ‘Blank Template’ option for a fresh canvas.
2. Set the Units: Go to ‘Window’ > ‘Model Info’ > ‘Units’ to set your preferred measurement system, such as metric or imperial.
3. Enable the Toolbars: Navigate to ‘View’ > ‘Toolbars’ and select those that are most relevant for gardening, like ‘Drawing’, ‘Shapes’, and ‘Styles’.
4. Import a Site Plan: If available, import a base map of your garden area. This can be done via ‘File’ > ‘Import’, allowing you to reference existing features accurately.
5. Create Layers: Organise your design elements using layers, which can be managed in the ‘Layers’ panel. This helps in isolating different components like plants, pathways, and structures.
Setting up your workspace correctly not only enhances your workflow but also ensures a smooth design process.
Creating a 2D Layout in SketchUp
Creating a 2D layout is a fundamental step in garden design, allowing you to visualise the overall arrangement of your garden elements. The following steps Artikel how to achieve this in SketchUp:
– Draw the Garden Boundaries: Use the ‘Rectangle’ tool to Artikel the shape of your garden area. Specify the dimensions to reflect your actual garden size.
– Add Pathways and Features: Utilise the ‘Line’ and ‘Arc’ tools to design paths, flower beds, and other garden features.
– Label Elements: For clarity, label each section of your garden layout using the ‘Text’ tool to ensure easy identification of different areas.
– Adjust Styles: Go to the ‘Styles’ panel and experiment with colour and texture settings to differentiate between various components, making your layout easier to interpret.
This process helps create a clear visual representation of your garden, allowing for easy adjustments and planning.
Using SketchUp Tools to Visualize Plant Placements
Visualising plant placements is crucial for understanding how your garden will look once fully established. SketchUp offers a variety of tools to assist in this process:
– Component Tool: Use the ‘Component’ tool to access a library of plants and garden accessories. Search for specific species or generic categories, allowing you to drag and drop them into your layout.
– Move Tool: Adjust the position of your plants using the ‘Move’ tool. This allows for experimentation with different placements to see how they interact with other elements in your design.
– Rotation Tool: The ‘Rotate’ tool enables you to change the angle of your plants, which is particularly useful for ensuring they fit well within your layout and are visually appealing.
– Section Planes: Create section planes to view your garden layout from different angles. This allows you to assess how plants will look in relation to pathways and structures from a 3D perspective.
Utilising these tools effectively not only enhances the detail of your garden design but also provides a realistic preview of your planting scheme, ensuring that what you envision can become a tangible reality.
Incorporating Elements into Your Garden Layout: How To Create A Garden Layout In SketchUp
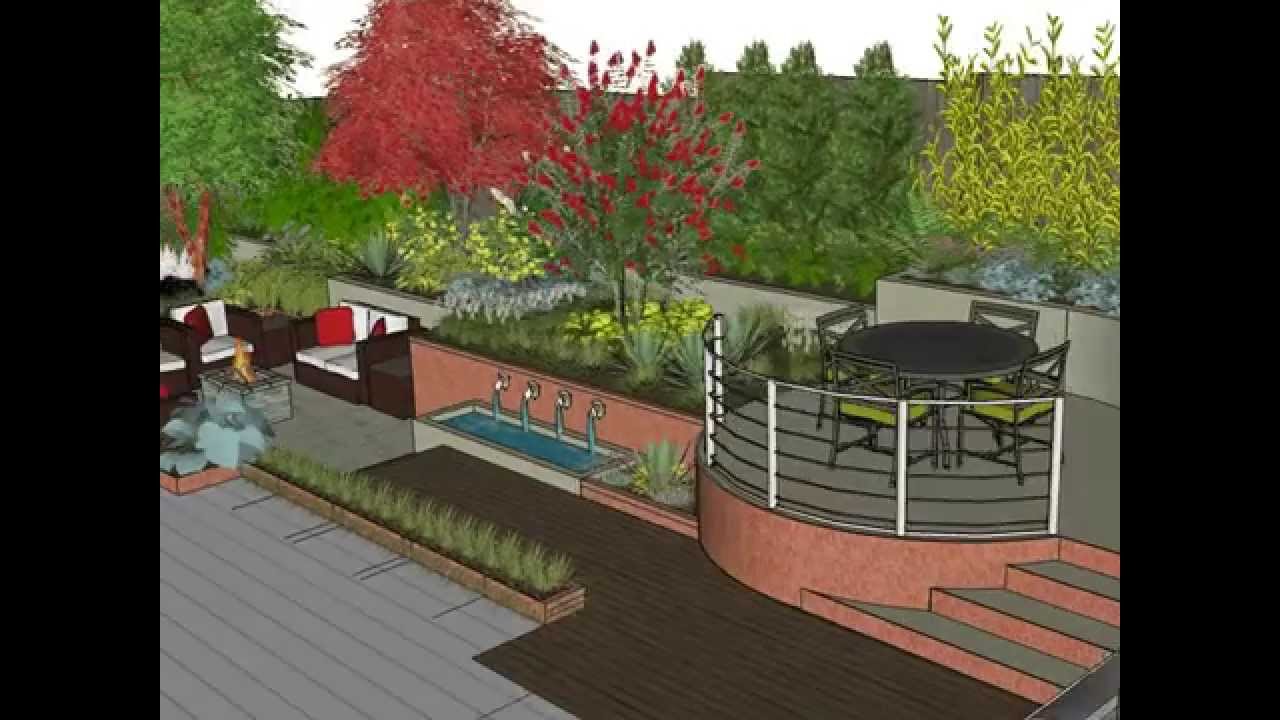
Creating a garden layout in SketchUp isn’t just about planting flowers and grass; it’s about building a living space that flows and feels right. Incorporating hardscape and softscape elements is essential for establishing structure and style. This section dives into adding pathways, patios, water features, lighting, and seating areas that pull the whole design together.
Adding Hardscape Elements: Pathways and Patios
Pathways and patios are integral to any garden layout as they provide functionality and aesthetics. In SketchUp, you can create these features using the ‘Rectangle’ tool to Artikel your desired shapes.
To add a pathway:
- Start by selecting the ‘Line’ tool to draw the pathway’s route.
- Use the ‘Push/Pull’ tool to give the pathway depth, making it feel more real.
- Consider using the ‘Paint Bucket’ tool to apply textures that resemble natural materials like stone or brick.
For patios, the process is similar but often involves larger surface areas:
- Define the patio’s perimeter with the ‘Rectangle’ tool.
- Utilise the ‘Push/Pull’ tool to shape your patio to the desired thickness.
- Enhance the design by adding a patterned texture that matches your garden style.
Including Water Features and Lighting
Water features can significantly enhance the ambiance of your garden. In SketchUp, you can add elements like ponds, fountains, or waterfalls by creating shapes with the ‘Circle’ tool for ponds, or using the ‘Follow Me’ tool for fountains.
When designing a water feature:
- Sketch out where you want the feature to sit, ensuring it’s visible and accessible.
- Use the ‘Push/Pull’ and ‘Scale’ tools to shape the water element to the desired dimensions.
- Apply a water-like texture for realism, using the ‘Paint Bucket’ tool.
Lighting is key for both aesthetics and safety. To incorporate lighting:
- Decide on the types of lights you want, such as spotlights or string lights.
- Use the ‘Components’ menu to find pre-made lighting fixtures or create your own using simple shapes.
- Position your lights strategically to highlight paths and focal points, ensuring coverage across your garden.
Integrating Seating Areas and Focal Points
Seating areas create spaces for relaxation and enjoyment in your garden. In SketchUp, you can design benches, chairs, or even a gazebo to serve as a focal point.
To create seating areas:
- Begin by designing the layout for your seating; this could be a circular space with seating around.
- Use the ‘Rectangle’ or ‘Circle’ tool to define the seating area.
- Showcase your seating by utilizing the ‘Push/Pull’ tool to add height and depth, making it more inviting.
Focal points are crucial for guiding the eye around the garden. This could be a sculpture, a large plant, or a stunning water feature. To integrate a focal point:
- Identify a central area in your layout where the focal point will reside.
- Design the item in detail, ensuring it contrasts with the surrounding elements.
- Ensure pathways lead towards this feature, drawing visitors in and enhancing the garden’s flow.
“The right balance of hardscape and softscape elements can transform a simple garden into a stunning oasis.”
Finalizing and Presenting Your Garden Design
When it comes to wrapping up your garden design project, it’s all about the details. You’ve put in the hard graft, now it’s time to tie things up neatly and present your vision to your clients or stakeholders. This phase is crucial—it’s where your creativity meets practicality, and your plans take shape in the real world.
To ensure that your garden layout hits the mark, it’s essential to have a checklist for reviewing your garden design before finalization. A structured approach will help you catch any overlooked elements and refine your plan to perfection.
Checklist for Reviewing Your Garden Layout
An effective checklist will streamline your review process, making sure every aspect of your design is covered. Here’s what you should include:
- Overall design coherence: Does the layout align with the client’s vision?
- Functionality: Are the paths and access points practical and user-friendly?
- Plant selection: Are the chosen plants suitable for the climate and soil conditions?
- Visual balance: Does the design provide a harmonious visual flow?
- Sustainability: Are there elements that promote eco-friendly practices?
- Budget considerations: Have you stayed within budget constraints, and are all materials feasible?
- Maintenance: Is the design realistic in terms of upkeep and care?
Once you’ve checked all these boxes, you can move on to presenting your garden layout. It’s all about making your design come alive and resonating with your audience.
Techniques for Presenting Your Garden Layout
A solid presentation is key to conveying your design’s value and generating excitement. Here are some techniques to make your presentation stand out:
- Visual aids: Use high-quality 3D renderings or models created in SketchUp to showcase your design.
- Physical samples: Bring along samples of materials and plants to give a tactile sense of your vision.
- Storytelling: Frame your design within the context of the client’s needs and desires—make it personal.
- Interactive elements: Engage your audience by allowing them to explore features of your design on a tablet or touchscreen.
- Feedback loops: Encourage questions and input throughout the presentation to foster collaboration and buy-in.
As you prepare to share your garden layout, it’s also helpful to consider different styles and preferences that might resonate with your audience. Every garden can be a reflection of personal taste and lifestyle.
Garden Layout Options Based on Styles and Preferences
Understanding diverse garden styles can help you tailor your designs to meet various client desires. Below is a table that Artikels different garden layout options based on styles and preferences:
| Garden Style | Description | Key Elements |
|---|---|---|
| Contemporary | A modern approach with clean lines and minimalistic features. | Sleek pathways, geometric shapes, and a limited plant palette. |
| Cottage | A charming, informal design with a variety of flowers and plants. | Mixed borders, winding paths, and rustic furniture. |
| Japanese Zen | A tranquil design focused on harmony and balance. | Water features, stone paths, and carefully placed plants. |
| Wildlife-Friendly | Encourages biodiversity and supports local wildlife. | Nectar-rich plants, birdhouses, and insect hotels. |
| Urban Garden | Maximizing small spaces with functional and aesthetic designs. | Vertical gardens, container planting, and rooftop layouts. |
By keeping these styles in mind, you can craft designs that resonate with your clients, ensuring that your presentation not only showcases your skills but also connects on a personal level.
If you’re looking to jazz up your space, learning how to create a 3D floor plan using Punch Home Design is the way to go, mate. It’s dead easy to shape your dream pad with this software. Plus, once your layout’s sorted, you can dive into the world of garden magic with the same tool. Check out the Punch Home Design Software for landscaping design ideas to see how you can transform your outdoor vibes.
It’s all about creating that killer environment, both inside and out.
If you’re keen on sprucing up your gaff, learning Punch Home Design Software for landscaping design ideas is a solid move. It lets you sketch out lush gardens and outdoor spaces that’ll make your mates go, “Wow!” And before you get to that, don’t forget to master how to create a 3D floor plan using Punch Home Design , as a killer layout is the foundation of any banging pad.
Let’s make your crib the talk of the town!