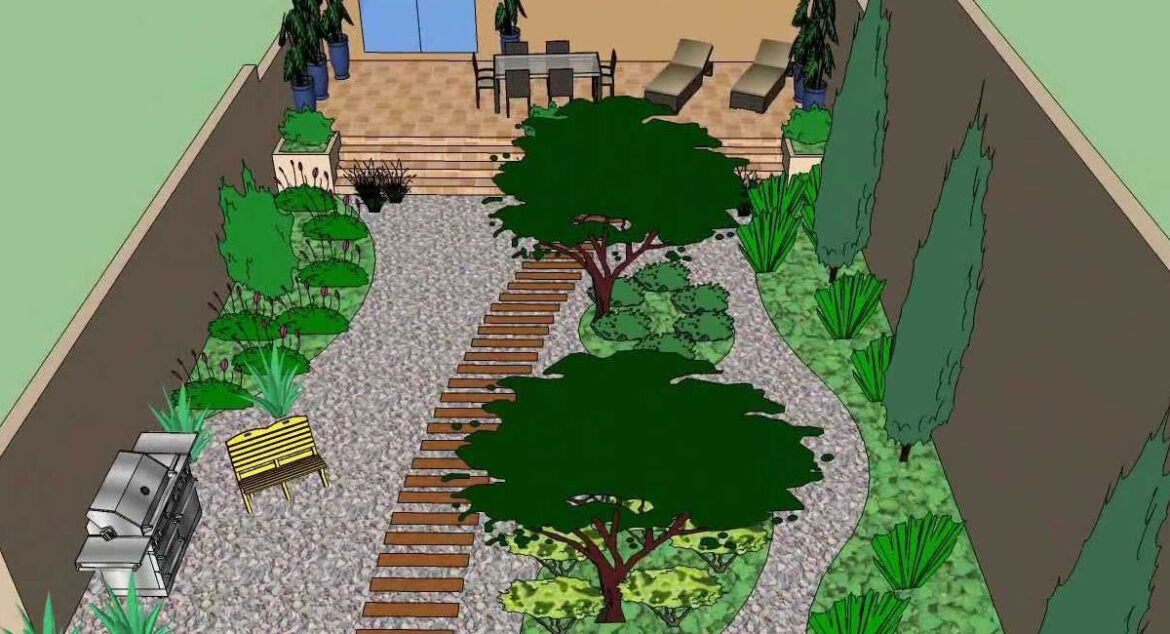
How to design a garden layout in SketchUp is a game-changer for anyone looking to create stunning outdoor spaces. Whether you’re a seasoned gardener or just starting out, using SketchUp allows you to visualize your garden ideas before getting your hands dirty. From understanding basic design principles to mastering the software’s tools, this guide covers everything you need to bring your dream garden to life.
We’ll dive into essential concepts like spatial planning and color theory that will help you create a harmonious layout. Plus, with step-by-step instructions on how to set up your project in SketchUp and tips on utilizing layers and textures, you’ll be equipped to create a design that’s not only functional but also visually appealing.
Understanding Garden Design Principles
Incorporating fundamental garden design principles is essential when using software like SketchUp to create stunning and functional garden layouts. These principles not only enhance the aesthetic appeal of the garden but also ensure that the space serves its intended purpose. By grasping concepts such as spatial planning and color theory, designers can bring a cohesive vision to life, maximizing both beauty and utility.
Spatial planning is a critical aspect of garden design that influences how different elements interact within the space. It involves arranging plants, paths, and features in a way that creates a harmonious flow while meeting the practical needs of the garden. Understanding this principle helps in making strategic decisions about where to place different components in your design.
Importance of Spatial Planning
Effective spatial planning can significantly impact how a garden feels and functions. When designing in SketchUp, consider the following aspects:
- Proportions: The size of each element should relate to others and the overall space. This ensures that larger features do not overwhelm smaller ones, creating balance.
- Functionality: Think about how the space will be used. If the garden is for entertaining, ensure there’s ample seating and pathways that facilitate movement.
- Accessibility: Design paths and areas that are easy to navigate. This includes considering the width of pathways and the height of plants.
- Focal Points: Establishing a focal point, such as a beautifully arranged flower bed or a striking sculpture, draws the eye and provides a sense of direction within the garden.
Color theory plays a vital role in enhancing the visual appeal of a garden design. By strategically using color, designers can evoke emotions, create harmony, and highlight specific areas of the garden.
Color Theory in Garden Design
Understanding color theory can elevate your garden’s aesthetics significantly. Here are some key components to consider:
- Color Wheel: Familiarize yourself with the color wheel, which includes primary, secondary, and tertiary colors. Use complementary colors to create contrast and vibrancy.
- Warm vs. Cool Colors: Warm colors (reds, oranges, yellows) can make spaces feel cozier and more inviting, while cool colors (blues, greens, purples) can create a calm and serene atmosphere.
- Seasonal Changes: Consider how colors will change with the seasons. Select plants that offer a range of colors throughout the year to maintain interest.
- Color Balance: Aim for a balanced color palette that complements the landscape. Too much of one color can be overwhelming, while a well-thought-out mix can create a sense of unity.
By understanding and applying these garden design principles in SketchUp, one can create layouts that are not only visually appealing but also functional and enjoyable. The integration of spatial planning and color theory leads to a well-rounded and inviting garden experience.
Getting Started with SketchUp for Garden Layouts
Setting up your garden design project in SketchUp is a straightforward process that allows you to bring your creative vision to life. This powerful 3D modeling software is especially useful for visualizing garden layouts, enabling you to experiment with various designs and plant placements seamlessly. Let’s dive into the essential steps and tools that will help you get started on your journey to a beautifully designed garden.
Setting Up a New Project in SketchUp
Before you can start designing, you need to create a new project in SketchUp. Follow these steps to set up your workspace effectively:
1. Launch SketchUp: Open the SketchUp application on your computer. If you’re new, choose the “Start Using SketchUp” option.
2. Select a Template: Choose a template that suits your project. For garden design, the “Architectural Design” template is often ideal as it includes a suitable scale.
3. Set Units: You can select the units you prefer to work with (inches or millimeters) in the template settings to ensure accuracy in your design.
4. Create a New Model: Click on “File” and then “New” to create a new model. This opens a blank canvas where you will be designing your garden.
5. Save Your Project: Save your work early on by clicking “File” and then “Save.” Name your project and choose a location on your computer.
Essential SketchUp Tools and Features for Garden Layouts
To create a well-structured garden layout, familiarize yourself with these essential tools and features in SketchUp:
1. Select Tool: This tool allows you to select and manipulate objects in your garden layout.
2. Rectangle Tool: Use this tool to draw the base layout of your garden, defining spaces for different plants and features.
3. Push/Pull Tool: This feature helps to create 3D shapes by extruding 2D shapes, which is useful for raising flower beds or paths.
4. Move Tool: Easily reposition objects, such as plants or garden furniture, within your layout.
5. Scale Tool: Adjust the size of objects accurately to fit your design specifications.
6. Paint Bucket Tool: Use this to apply colors and textures to different surfaces, enhancing the realism of your garden design.
Utilizing these tools effectively will enable you to create a detailed and visually appealing garden layout that meets your design goals.
Importing and Exporting Garden Plans in SketchUp, How to design a garden layout in SketchUp
When working on garden designs, it’s important to know how to import existing plans or export your designs for sharing and presentation. Here’s how to do it:
– Importing Plans:
– Click on “File” and then “Import” to bring in images or CAD files that can serve as a reference for your garden layout.
– Ensure the imported file is in a compatible format such as .jpg, .png, or .dwg.
– Exporting Designs:
– To share your garden layout, go to “File” and select “Export.” Choose your desired format, such as .jpg for images or .pdf for printable plans.
– Additionally, SketchUp allows you to export your model as a .skp file for use in other projects or software.
Utilizing these import and export functionalities streamlines the design process and makes collaboration with others easier, ensuring your garden plan is accessible and visually communicative.
Creating a Garden Layout in SketchUp
Designing a garden layout in SketchUp can transform your ideas into a visually engaging plan. This section will delve into key techniques for layering, accurate measurements, and adding textures and colors to create a lifelike representation of your garden. By mastering these elements, you can enhance your design process and achieve a professional-looking layout.
Using Layers to Organize Garden Design Elements
Utilizing layers in SketchUp is essential for managing various components of your garden design. Layers allow you to separate different elements, making it easier to work on specific areas without distraction. Here are some tips on effectively using layers:
- Create distinct layers: Assign separate layers for features like plants, pathways, water elements, and structures. This organization helps to isolate modifications and makes it easy to toggle visibility.
- Label layers clearly: Use descriptive names such as “Flowers”, “Shrubs”, and “Hardscape” to identify layers quickly. This approach streamlines your workflow and aids in project navigation.
- Utilize layer properties: Adjust layer properties such as color and transparency to differentiate elements easily. For example, you could use a shaded layer for trees while keeping pathways clear to visualize the layout without clutter.
Accurate Measurement and Scaling of Garden Features
Achieving accurate measurements and scaling in SketchUp is critical for a realistic garden layout. Here are the essential steps and considerations:
- Set the model units: Before starting your design, establish the measurement units (inches, feet, meters) that suit your project. This adjustment ensures every element is scaled correctly from the beginning.
- Use the Tape Measure Tool: This tool allows you to create guidelines and measure distances accurately. Click and drag to set points, and SketchUp will display real-time measurements to assist you in placing features correctly.
- Scale objects accurately: When adding pre-designed components or plants, ensure they are scaled to match your design’s dimensions. Select the object, then use the Scale Tool to resize while maintaining proportions.
Adding Textures and Colors for Realism
To bring your garden layout to life, incorporating textures and colors is essential. This process enhances the visual appeal and realism of your design, making it easier to communicate your vision. Consider the following steps:
- Select appropriate materials: Use the Paint Bucket Tool to choose from SketchUp’s library of materials, including grass, soil, and stone textures. Selecting the right texture helps to depict the actual materials you plan to use in your garden.
- Apply colors effectively: Choose colors that reflect the natural palette of your garden space. For instance, soft greens for grass, vibrant hues for flowers, and neutral tones for pathways can create an inviting atmosphere.
- Adjust texture properties: Modify the scale and orientation of textures to achieve a realistic look. For example, using a larger scale for grass textures can prevent pixelation and enhance the overall design quality.
- Utilize shadows and lighting: Adjust the time of day and shadows within SketchUp to visualize how your garden will look under different lighting conditions. This feature is crucial for understanding how plants and features will interact with sunlight.
Enhancing Your Garden Design with SketchUp Plugins: How To Design A Garden Layout In SketchUp
SketchUp is a powerful tool for creating garden layouts, but its capabilities can be significantly enhanced with the use of plugins. These extensions can introduce new functions and tools specifically tailored for landscaping, enabling you to create more intricate and realistic designs. By leveraging the right plugins, you can improve your workflow, add realistic elements, and visualize your garden concepts more effectively.
Integrating plugins into your SketchUp experience opens up a world of possibilities for garden design. Some popular plugins that can specifically enhance your landscaping projects include “SketchUp PlaceMaker,” “Artisan,” and “Land F/X.” Each of these tools provides unique features that cater to different aspects of garden design, from terrain modeling to plant database integration.
Popular Plugins for Garden Design
Before diving into the installation process, it’s essential to understand how these plugins can elevate your designs. Here’s a quick overview of three popular plugins for garden design:
- SketchUp PlaceMaker: This plugin allows users to import real-world data, including terrain and buildings, which can be incredibly useful for contextualizing your garden layout within an existing landscape.
- Artisan: Artisan brings advanced sculpting tools to SketchUp, allowing you to model intricate terrain and organic shapes that can make your garden design more dynamic.
- Land F/X: A comprehensive landscape design plugin that includes a library of plants, irrigation systems, and other essential elements necessary for creating realistic garden layouts.
Installing and Using Specific Plugins
Getting started with these plugins typically involves a straightforward installation process. Here’s how to install and begin using three popular plugins tailored for landscaping:
1. Installing SketchUp PlaceMaker:
– Go to the Extension Warehouse within SketchUp.
– Search for “PlaceMaker” and click on the install button.
– Once installed, open a new or existing SketchUp project, navigate to the PlaceMaker toolbar, and begin importing geographic data to enhance your design.
2. Using Artisan:
– Similar to PlaceMaker, find Artisan in the Extension Warehouse and install it.
– Open SketchUp and select Artisan from the toolbar.
– Use it to sculpt terrain by selecting surfaces and applying various tools such as “Sculpt” to create hills, valleys, and other landscape features.
3. Setting Up Land F/X:
– Install Land F/X from the Extension Warehouse.
– After installation, access Land F/X from the SketchUp menu.
– Utilize its extensive plant library and tools to place vegetation accurately according to your garden design specifications.
Advantages of 3D Modeling Tools for Visualization
Utilizing 3D modeling tools like SketchUp allows gardeners and landscapers to visualize their designs in a more immersive way. The advantages of these tools include:
- Enhanced Visualization: 3D models provide a realistic representation of how plants, structures, and terrains will look together, aiding in better decision-making.
- Improved Communication: Clients and collaborators can better understand the proposed design, making it easier to convey ideas and gain approval.
- Efficient Design Revisions: Changes can be implemented quickly in a digital format, allowing for rapid iterations based on feedback.
“Visualization through 3D modeling not only brings designs to life but also minimizes costly mistakes during implementation.”
If you’re looking to design your perfect outdoor space, understanding how to create a garden layout in SketchUp made easy is essential. This user-friendly tool allows you to visualize your ideas and make adjustments on the fly, so you can see what your garden will truly look like before planting any seeds. Plus, once you’ve got the layout down, don’t forget to explore ways to enhance your design with various features available in the software.
To really step up your garden design game, consider using SketchUp plugins for garden design efficiency. These tools can save you a ton of time by automating repetitive tasks and offering advanced options that standard SketchUp might lack. Integrating these plugins into your design workflow can make the entire process smoother and more enjoyable, allowing you to focus on creativity rather than logistics.