How to use Home Designer Suite effectively is a pivotal inquiry for anyone keen on transforming their spatial visions into tangible designs. This intuitive software serves as a creative platform, enabling users to bring their dream spaces to life with ease. Embarking on your journey with Home Designer Suite will unveil an array of features and tools that cater to both novices and seasoned designers alike, ensuring a seamless design experience.
From the moment you install the software, you will be equipped with an array of functionalities that streamline the design process. Understanding the basic features is vital, as it sets the foundation for creating intricate floor plans, personalising layouts, and ultimately crafting a space that reflects your unique style.
Getting Started with Home Designer Suite: How To Use Home Designer Suite Effectively
Home Designer Suite is a powerful design software that allows users to create detailed home layouts and landscapes. Ideal for both novices and seasoned designers, this suite offers a variety of features and tools tailored for an intuitive design experience. Understanding the basic functionalities and how to set up the software is essential for making the most out of its capabilities.
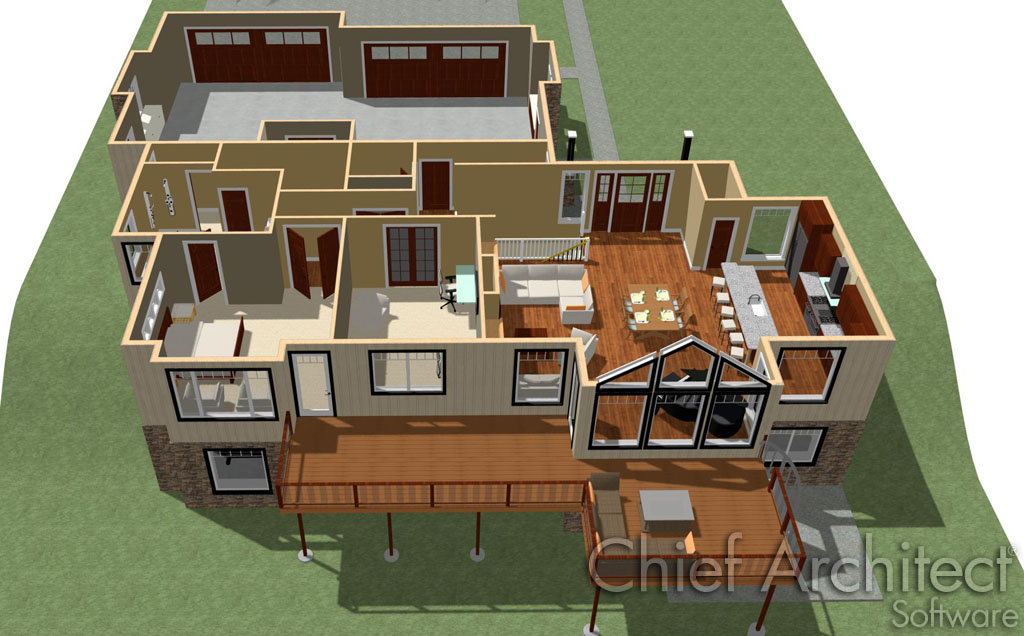
The fundamental features of Home Designer Suite include an extensive library of pre-designed objects, a comprehensive 3D rendering engine, and tools for interior and exterior design. Users can easily modify floor plans, design custom rooms, and generate high-quality visualisations of their projects. The interface is user-friendly, which significantly aids in navigating through the various tools and options available.
Basic Features and Tools
In order to effectively utilise Home Designer Suite, it is crucial to familiarise oneself with its primary features. The following are key tools that play a significant role in the design process:
- Floor Plan Design: Create precise layouts with drag-and-drop functionality to add walls, doors, and windows.
- 3D Visualisation: Switch between 2D and 3D views, allowing for a comprehensive perspective of the design.
- Object Library: Access a rich library of furniture, fixtures, and landscaping elements to enhance your designs.
- Material Selection: Choose from a variety of materials and colours to customise surfaces and finishes.
- Measurement Tools: Use integrated measurement tools to ensure accurate dimensions throughout the design.
Installation and Setup Guide
To get started with Home Designer Suite, install and set up the software by following these straightforward steps:
1. Download the Software: Visit the official Home Designer Suite website and download the latest version of the software.
2. Run the Installer: Locate the downloaded file and double-click to initiate the installation process.
3. Follow Installation Prompts: Accept the terms and conditions, then proceed through the installation wizard, selecting your preferred installation directory.
4. Complete Installation: Once the installation is complete, launch the application from your desktop or programme menu.
5. Create an Account or Sign In: For first-time users, create a new account or sign in if you already have one. This may help in syncing your projects across devices.
6. Activate the Software: Enter your product key if prompted, or choose trial mode to explore the software’s features.
Navigating the Interface
Navigating the Home Designer Suite interface effectively is paramount for successful design management. The layout is designed for user convenience, and familiarising oneself with its components can greatly enhance productivity. Key areas to focus on include:
– Tool Palette: Located typically on the left side, this palette houses all necessary tools for designing, including drawing walls, adding rooms, and inserting furniture.
– Properties Panel: Found on the right side, this panel allows users to configure properties of selected objects, such as size, colour, and materials.
– 3D Viewport: The central space displays the current design in either 2D or 3D, providing a visual representation of the project as it develops.
– Navigation Controls: Utilise zoom and pan tools to navigate through large designs efficiently, ensuring all areas of the project are easily accessible.
Utilising these tools and areas of the interface effectively will empower users to streamline their design process, ultimately resulting in more cohesive and professional outcomes. Mastery of the interface will also reduce the learning curve, allowing for quicker project completions.
Designing Your Space
In the realm of interior design, crafting a functional and aesthetically pleasing space is paramount. Home Designer Suite provides a robust platform that empowers users to transform their visions into reality with ease. This section delves into the techniques for creating floor plans, leveraging templates, and seamlessly incorporating furniture and fixtures into your design.
Creating Floor Plans
The foundation of any design endeavour lies in a well-structured floor plan. Home Designer Suite offers intuitive tools that facilitate the creation of accurate and detailed layouts. Users can begin by defining the dimensions of their space, which can be accomplished through manual input or by using the software’s built-in measurement tools.
Once the dimensions are set, the drag-and-drop feature allows for the easy placement of walls, windows, and doors. The software supports various architectural styles, enabling users to select wall types and materials that align with their design vision. Additionally, the 3D view feature provides a realistic perspective of the design, allowing for adjustments before finalising the layout.
Utilising Templates and Pre-Designed Layouts, How to use Home Designer Suite effectively
Templates and pre-designed layouts serve as invaluable resources for both novices and experienced designers. Home Designer Suite boasts a comprehensive library of templates that cater to a multitude of design styles and space requirements. These templates are pre-configured with dimensions and layouts, allowing users to jumpstart their projects without starting from scratch.
Utilising these resources not only saves time but also provides inspiration for users unsure of where to begin. By examining various templates, designers can discover innovative layouts and ideas that can be adapted to fit their specific needs. Furthermore, templates can be customised, allowing for the addition or modification of elements while retaining the integrity of the initial design.
Incorporating Furniture and Fixtures
The integration of furniture and fixtures plays a crucial role in bringing a design to life. Home Designer Suite provides an extensive library of 3D models representing various furniture pieces and fixtures, ranging from sofas to lighting installations. Users can easily drag and drop these items into their floor plans, adjusting their size and orientation to fit the designated spaces.
When selecting furniture, it is essential to consider both functionality and aesthetics. Ensuring that each piece complements the overall design theme while maintaining sufficient space for movement is vital. The software’s ability to visualise the design in 3D enhances this process, allowing users to see how different elements interact within the space.
Moreover, the software supports layering, enabling designers to add rugs, curtains, and other decorative accessories that enrich the ambience of their space. This comprehensive approach ensures that every detail is accounted for, leading to a cohesive and inviting environment.
Customization and Personalization

In the realm of home design, the ability to customise and personalise your space is paramount. Home Designer Suite offers a plethora of options that enable users to tailor their projects to reflect their unique style and preferences. From colour schemes to custom measurements, these features allow for a truly bespoke design experience.
Custom Colour Schemes and Materials
Home Designer Suite provides extensive options for customising colour schemes and materials within your projects. Users can select from a vast palette of colours, ensuring that every element aligns with their vision for the space. Material options range from standard offerings such as wood and stone to more contemporary selections like glass and metal, allowing for versatility in design.
For effective application:
- Utilise the colour wheel tool to find complementary hues that enhance the aesthetic of your space.
- Experiment with different textures and finishes by layering materials in your design, which can add depth and character.
- Incorporate user-uploaded textures, enabling complete control over the visual aspects of your design.
Custom Dimensions and Measurements
Precision is key when it comes to home design, and Home Designer Suite offers robust tools for adding custom dimensions and measurements. Users can easily input specific dimensions for walls, windows, and furniture, tailoring the design to the unique layout of their home. This ensures that designs not only look good but are also practical and functional.
To enhance accuracy, consider these techniques:
- Utilise the snap-to-grid feature which assists in aligning elements and maintaining consistent measurements throughout your design.
- Adjust the scale settings to suit your project’s needs, whether for small rooms or expansive open-plan areas.
- Employ the measurement display tool to ensure that all dimensions are clearly indicated and can be easily referenced during the design process.
Advanced Personalization Features
To further personalise your designs, Home Designer Suite provides advanced features that enhance both aesthetics and functionality. These include options for sophisticated lighting arrangements and detailed landscaping elements.
Consider the following advanced features:
- Lighting Designer, which allows for the placement and adjustment of various light fixtures, enabling users to create ambient, task, or accent lighting tailored to specific areas.
- The landscaping tool, which offers a library of plants, trees, and decorative elements that can be integrated into outdoor spaces, providing a cohesive design from indoors to outdoors.
- 3D visualisation capabilities that help bring designs to life, allowing users to see how their choices impact the overall look and feel of the space in real-time.
Saving and Sharing Your Designs

In the realm of home design, effectively managing your projects is as crucial as the design process itself. Home Designer Suite offers various functionalities to save, share, and export your designs, ensuring that your creative efforts are preserved and communicated effectively. This section delves into the practical steps for saving your projects and the options available for sharing them with clients and collaborators.
Saving Projects in Various Formats
Properly saving your designs is paramount for future reference and revisions. Home Designer Suite provides several formats that cater to different needs, allowing users to maintain project integrity and accessibility. The primary saving formats include:
- Native Project Format (.HDP): This is the default format for saving your design files, preserving all components, layers, and settings within Home Designer Suite.
- PDF Format: Ideal for sharing and printing, saving your designs as PDFs allows for easy distribution without losing quality or detail.
- Image Formats (JPEG, PNG): For presentations or quick sharing, exporting your designs as image files is convenient and maintains visual fidelity.
- 3D Model Export: Users can export their designs to various 3D formats for use in other software or to create interactive presentations.
Incorporating these saving options enables designers to safeguard their work while also ensuring it remains flexible for various applications.
Sharing Designs with Clients or Collaborators
Effective communication with clients and collaborators can significantly influence project success. Home Designer Suite enhances this process by offering multiple avenues for sharing your designs. Consider the following methods to facilitate collaboration:
- Email Sharing: Directly share your design files via email, allowing clients to review and provide feedback quickly.
- Cloud Storage Integration: Use services such as Dropbox or Google Drive to upload and share your projects, promoting easy access and collaboration in real-time.
- Presentation Mode: Engage clients with a presentation mode that showcases your design in an interactive format, perfect for meetings or pitches.
These sharing options not only streamline communication but also enhance collaborative efforts, ensuring that all parties are on the same page throughout the design process.
Exporting Designs for Presentation or Publishing Purposes
When it comes to showcasing your work, exporting designs in the right format is essential for professional presentation or publication. Home Designer Suite offers various exporting features that cater to these needs effectively.
- High-Resolution Images: Export your designs as high-res images suitable for print materials, ensuring clarity and detail.
- Professional PDF Reports: Generate comprehensive reports that include your design layouts, specifications, and details, which are ideal for client presentations or project proposals.
- Interactive 3D Walkthroughs: Create immersive experiences by exporting your designs into interactive formats, allowing clients to explore the space virtually.
Utilising these exporting options equips designers with the tools necessary to present their work in a polished and professional manner, enhancing client engagement and understanding of the proposed designs.
For those keen on horticultural design, Creating a garden design using SketchUp made easy offers an excellent starting point. This resource simplifies the complexities often associated with garden planning. Additionally, beginners can benefit immensely from the SketchUp garden layout tutorial for beginners , which provides step-by-step guidance to ensure that your design aspirations blossom beautifully.
Embarking on a landscaping project can be daunting, but the SketchUp garden layout tutorial for beginners is an invaluable tool for novices. It covers essential techniques that will enable you to create stunning outdoor spaces. Once you’ve grasped the basics, you might want to explore Creating a garden design using SketchUp made easy , which further enhances your ability to visualise and plan your garden effectively.