Steps for making a garden layout in SketchUp is your go-to guide for transforming your garden dreams into reality using this innovative design software. Whether you’re a seasoned gardener or just starting, understanding the fundamentals of garden layout design is crucial. You’ll learn how to assess your space, consider essential elements like sunlight and drainage, and get familiar with SketchUp to breathe life into your ideas.
From the basics of garden design themes to step-by-step instructions on using SketchUp, this guide covers everything you need to create stunning layouts. By the end, you’ll be well-equipped to visualize your garden’s potential and make adjustments that elevate your design to the next level.
Understanding the Basics of Garden Layout Design
Designing a garden layout is more than just arranging plants; it is about creating a harmonious space that reflects your style and meets practical needs. Understanding the essential elements of garden design can help you visualize your ideal outdoor environment. From selecting a theme to assessing your garden space, each step is crucial in planning a layout that thrives.
The essential elements of garden design encompass various themes and styles, each contributing to the overall aesthetic and functionality of the garden. Themes can range from formal to informal, with styles that include modern, rustic, or cottage gardens. Each theme is characterized by specific plant selections, materials, and layouts that establish the desired atmosphere. For instance, a formal garden may feature symmetrical patterns and clipped hedges, while a cottage garden embraces a more relaxed, densely planted style.
Assessing Your Garden Space for Layout Planning
Before diving into the design process, a thorough assessment of your garden space is necessary. This assessment informs decisions about plant selection, layout, and overall design. Key factors to consider include:
- Dimensions: Measure the length and width of your garden area to determine how much space you have to work with. Understanding the size helps in choosing appropriate plant sizes and quantities.
- Existing Features: Take note of any existing structures, such as trees, fences, or sheds. These can influence your design and create focal points in the garden.
- Accessibility: Ensure that pathways and access points are considered for ease of movement and maintenance within the garden.
Assessing these elements will allow you to create a practical and visually appealing layout that meets your gardening goals.
Importance of Sunlight, Soil Type, and Drainage
When designing a garden, understanding the environmental conditions is paramount. The following factors play a significant role in the success of your garden layout:
- Sunlight: Evaluate how much sunlight different areas of your garden receive throughout the day. Most plants require at least 6 hours of sunlight per day, so identify sunny spots for sun-loving plants and shadier areas for those that thrive in low light.
- Soil Type: Test the soil composition to determine if it is sandy, clay, loamy, or rocky. Different plants have varying soil preferences, and knowing your soil type will guide you in selecting compatible plants.
- Drainage: Observe how water drains in your garden. Poor drainage can lead to root rot and other plant health issues. Incorporating well-draining soil and proper grading can improve water flow and plant health.
Taking these factors into consideration ensures that your garden layout not only looks good but also supports healthy plant growth and longevity.
The right combination of sunlight, soil, and drainage creates the foundation for a thriving garden.
Getting Started with SketchUp
To dive into garden design using SketchUp, it’s essential to get the software up and running on your device. SketchUp is a powerful 3D modeling tool that simplifies the process of creating garden layouts, making it a favorite among landscape designers and enthusiasts alike. This section will guide you through the steps to download and install SketchUp, set up your workspace for optimal design, and navigate the SketchUp interface, ensuring you are well-equipped to create stunning garden layouts.
Downloading and Installing SketchUp
Before you can start designing, you’ll need to have SketchUp installed on your computer. Follow these steps to download and set up the software:
- Visit the official SketchUp website at sketchup.com.
- Select the “Start Free” or “Download” button to access the various versions available.
- Choose the version that suits your needs. SketchUp offers a free version for personal use, and a paid version for professionals.
- After selecting your version, complete the sign-up process if required, providing your email address and other necessary details.
- Once registered, follow the on-screen instructions to download the installer for your operating system (Windows or Mac).
- Open the downloaded file and follow the installation prompts to install SketchUp on your computer.
Setting Up the Workspace, Steps for making a garden layout in SketchUp
Creating an optimal workspace is crucial for an efficient design process. Properly setting up your workspace in SketchUp can enhance your workflow and improve your garden design experience. Here’s how to do it:
- Launch SketchUp and select the template that aligns with your garden design—landscape templates are especially useful.
- Adjust the units of measurement by navigating to “Window” > “Model Info” > “Units” and choosing between inches, feet, or metric.
- Set the accessibility of your toolbars by right-clicking on the toolbar area and selecting the tools you frequently use.
- Utilize the “Views” menu to establish your preferred view angles and styles, which will help in visualizing designs more effectively.
- Save your workspace layout by going to “Window” > “Preferences” > “Workspace” to ensure that your settings are retained for future projects.
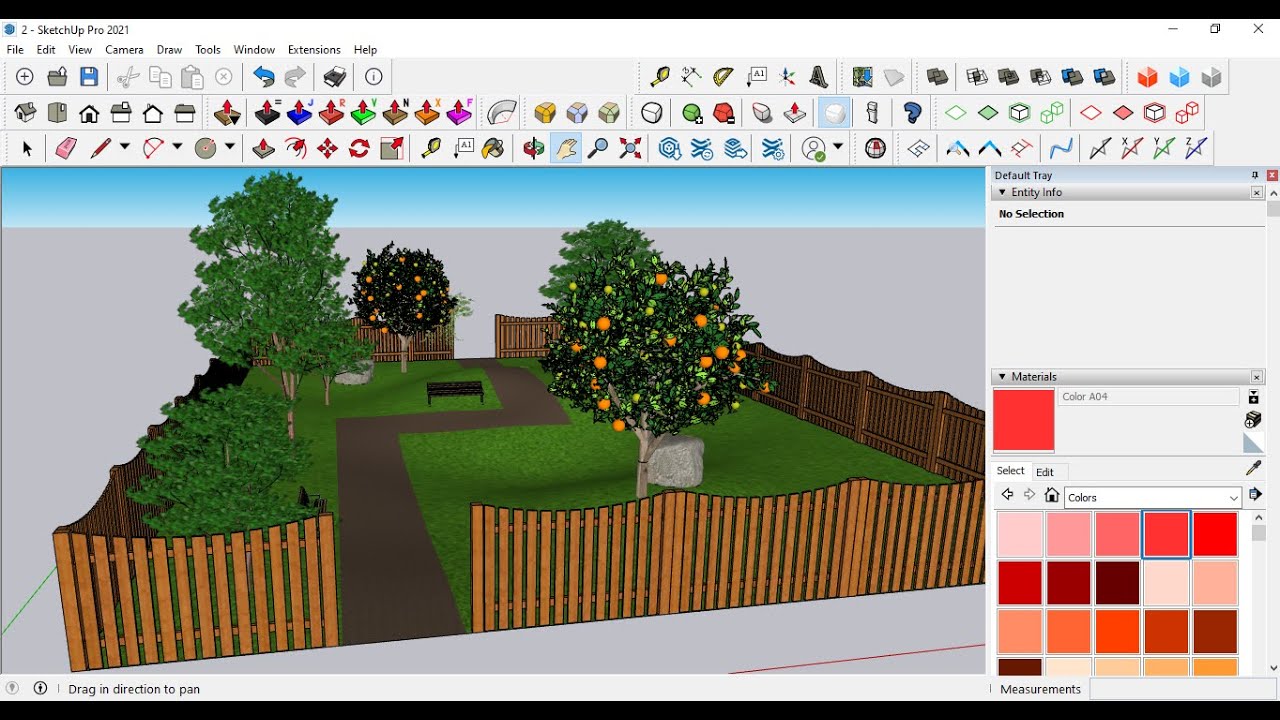
Navigating the SketchUp Interface
Familiarizing yourself with the SketchUp interface is vital for making the most of this powerful tool. The interface consists of several key components that facilitate garden layout design:
Key areas of the SketchUp interface include the drawing area, toolbars, and the status bar, which provides guidance as you work.
- The Drawing Area is your main canvas where all modeling takes place. Zoom in and out using the scroll wheel on your mouse to get a closer look at your design.
- The Toolbars contain various tools for drawing, modifying, and measuring. Commonly used tools include the Select Tool, Rectangle Tool, and the Push/Pull Tool.
- The Status Bar is located at the bottom of the interface and displays important information about the tool you are currently using, along with helpful hints.
- Explore the Components Panel to access pre-made models such as plants, garden furniture, and other landscaping elements that can be integrated into your design.
- Utilize the Layers Panel to manage different elements of your garden layout, allowing for better organization and visibility controls.
Creating the Garden Layout in SketchUp: Steps For Making A Garden Layout In SketchUp
Designing a garden layout in SketchUp allows for a clear visualization of your landscaping ideas, making it easier to plan and implement your garden. By using this 3D modeling software, you can create an accurate representation of garden beds, paths, and other elements. The following sections will detail the process of drawing these features and organizing your design effectively.
Drawing Garden Beds, Paths, and Features
To create your garden layout, start by drawing the main components like garden beds and paths. Begin with a basic Artikel of your garden area:
1. Set Up the Drawing Area: Choose the dimensions of your garden space. Use the rectangle tool to define the perimeter.
2. Draw Garden Beds: Use the rectangle or polygon tool to create beds. Click and drag to define the shape, adjusting dimensions as necessary.
3. Pathways: Draw paths by selecting the line tool to create straight paths or the arc tool for curved paths. Ensure paths are wide enough for easy access, typically around 3 feet.
4. Add Features: Use basic shapes to represent features like benches, fences, or water elements. The 3D Warehouse in SketchUp offers a variety of pre-made models to enhance your design.
Using these steps, you can build a cohesive garden layout that meets your functional and aesthetic needs.
Incorporating Plants, Trees, and Other Elements
Adding plants and trees to your layout is crucial for visualizing the final look of your garden. Here’s a step-by-step list to incorporate these elements effectively:
1. Select Plants: Research and choose plants suitable for your climate and soil type.
2. Place Trees: Use the circle or ellipse tool to represent trees. Make them larger than other plants to emphasize their importance in the layout.
3. Position Plants: Use the move tool to adjust the locations of plants and trees, ensuring they complement each other and have adequate spacing for growth.
4. Add Color and Texture: Use colors to differentiate between various plant types and textures to represent different foliage styles.
5. Check Compatibility: Consider light and water needs to ensure that plants are placed appropriately for their health and growth.
This method of visualizing plants helps create a balanced and harmonious garden.
Using Layers in SketchUp
Organizing your garden layout with layers is essential for managing various components effectively. Layers allow you to separate elements for easier editing and viewing:
1. Create New Layers: Open the layers panel and set up layers for different garden components, such as plants, paths, and structures.
2. Assign Elements to Layers: As you create elements, assign them to the relevant layer. For example, all plants can go on one layer, while paths are on another.
3. Toggle Layers: Use the visibility options to toggle layers on and off. This is particularly helpful when focusing on specific areas of your layout.
4. Edit with Ease: When making adjustments, you can lock layers to prevent accidental changes to elements you aren’t currently working on.
Utilizing layers enhances your workflow, allowing for a streamlined design process and making it easier to visualize and edit different aspects of your garden layout.
Finalizing and Visualizing Your Garden Design
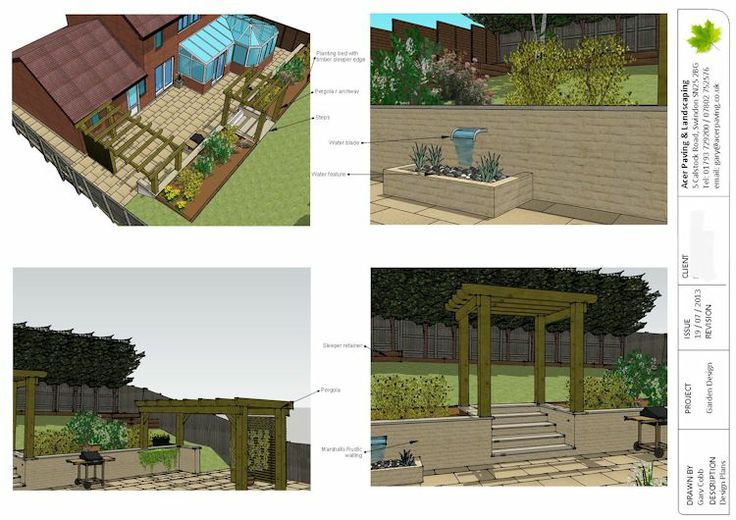
As you wrap up your garden layout project in SketchUp, it’s time to focus on how to effectively render and present your design. This stage is crucial as it not only enhances the visual appeal of your project but also helps in communicating your vision to others. By applying various rendering techniques and presentation strategies, you can ensure that your design stands out and conveys its intended message.
Rendering Techniques in SketchUp
To bring your garden layout to life, several rendering methods can enhance the realism and aesthetics of your model. Applying these techniques can significantly elevate the visual quality of your presentation.
- Using V-Ray for SketchUp: This powerful rendering plugin can create photorealistic images of your garden design. With features like global illumination and realistic material rendering, V-Ray enhances the details and textures of your model, making plants, soil, and hardscapes look authentic.
- SketchUp’s Built-in Rendering Options: Use the built-in styles in SketchUp, such as the “Shaded with Textures” style, to provide a simple yet effective visual representation of your design. This method is quick and easy, allowing for rapid visualization without complex rendering.
- Animation and Scene Transitions: Create dynamic scenes within SketchUp by setting up different views of your garden layout. Smooth transitions between these scenes can simulate a walkthrough, allowing viewers to experience the design from multiple perspectives.
Presenting Your Design Effectively
Communicating your garden design is just as important as creating it. Several strategies can be employed to effectively present your layout to friends, clients, or stakeholders.
- Creating a Walkthrough: Utilize the animation feature in SketchUp to create a walkthrough animation that guides viewers through your garden. This immersive experience can highlight key features and design elements, making it easier for others to visualize the final outcome.
- Design Slideshows: Compile images of your garden layout into a visually appealing slideshow. Use a presentation tool like PowerPoint or Google Slides to incorporate before-and-after images, close-ups of specific features, and notes about plant selections and materials.
- Interactive Presentations: Consider using tools like SketchUp Viewer to allow clients or friends to explore the model themselves. This interactive approach offers an engaging way for stakeholders to appreciate the design details at their own pace.
Incorporating Feedback into Your Design
Feedback is an essential part of the design process, helping you refine your garden layout. Embrace constructive criticism and personal preferences to enhance your project before implementation.
- Gathering Feedback: Present your design to friends, family, or fellow garden enthusiasts and solicit their input. Use surveys or informal discussions to capture their thoughts on functionality, aesthetics, and plant choices.
- Making Adjustments: Be open to modifying your design based on the feedback received. Whether it’s changing plant placements, adjusting hardscape materials, or rethinking layout flows, use this input to make informed decisions.
- Iterative Design Process: Remember that design is iterative. Don’t hesitate to go back to SketchUp, make necessary changes, and re-render your model. This process may require several iterations to achieve the perfect balance that meets both your vision and the input received.
If you’re looking to get started with garden design, learning how to create a garden layout in SketchUp made easy is a great first step. This platform offers intuitive tools that can help you visualize your dream garden layout without any hassle. Once you’re comfortable with the basics, you might want to streamline your process by exploring various resources that enhance your design skills.
After getting the hang of the layout, you can boost your creativity by using SketchUp plugins for garden design efficiency. These plugins can save you time and help you visualize elements more effectively, making your design process smoother and more dynamic. Embracing these tools can really elevate your gardening projects!